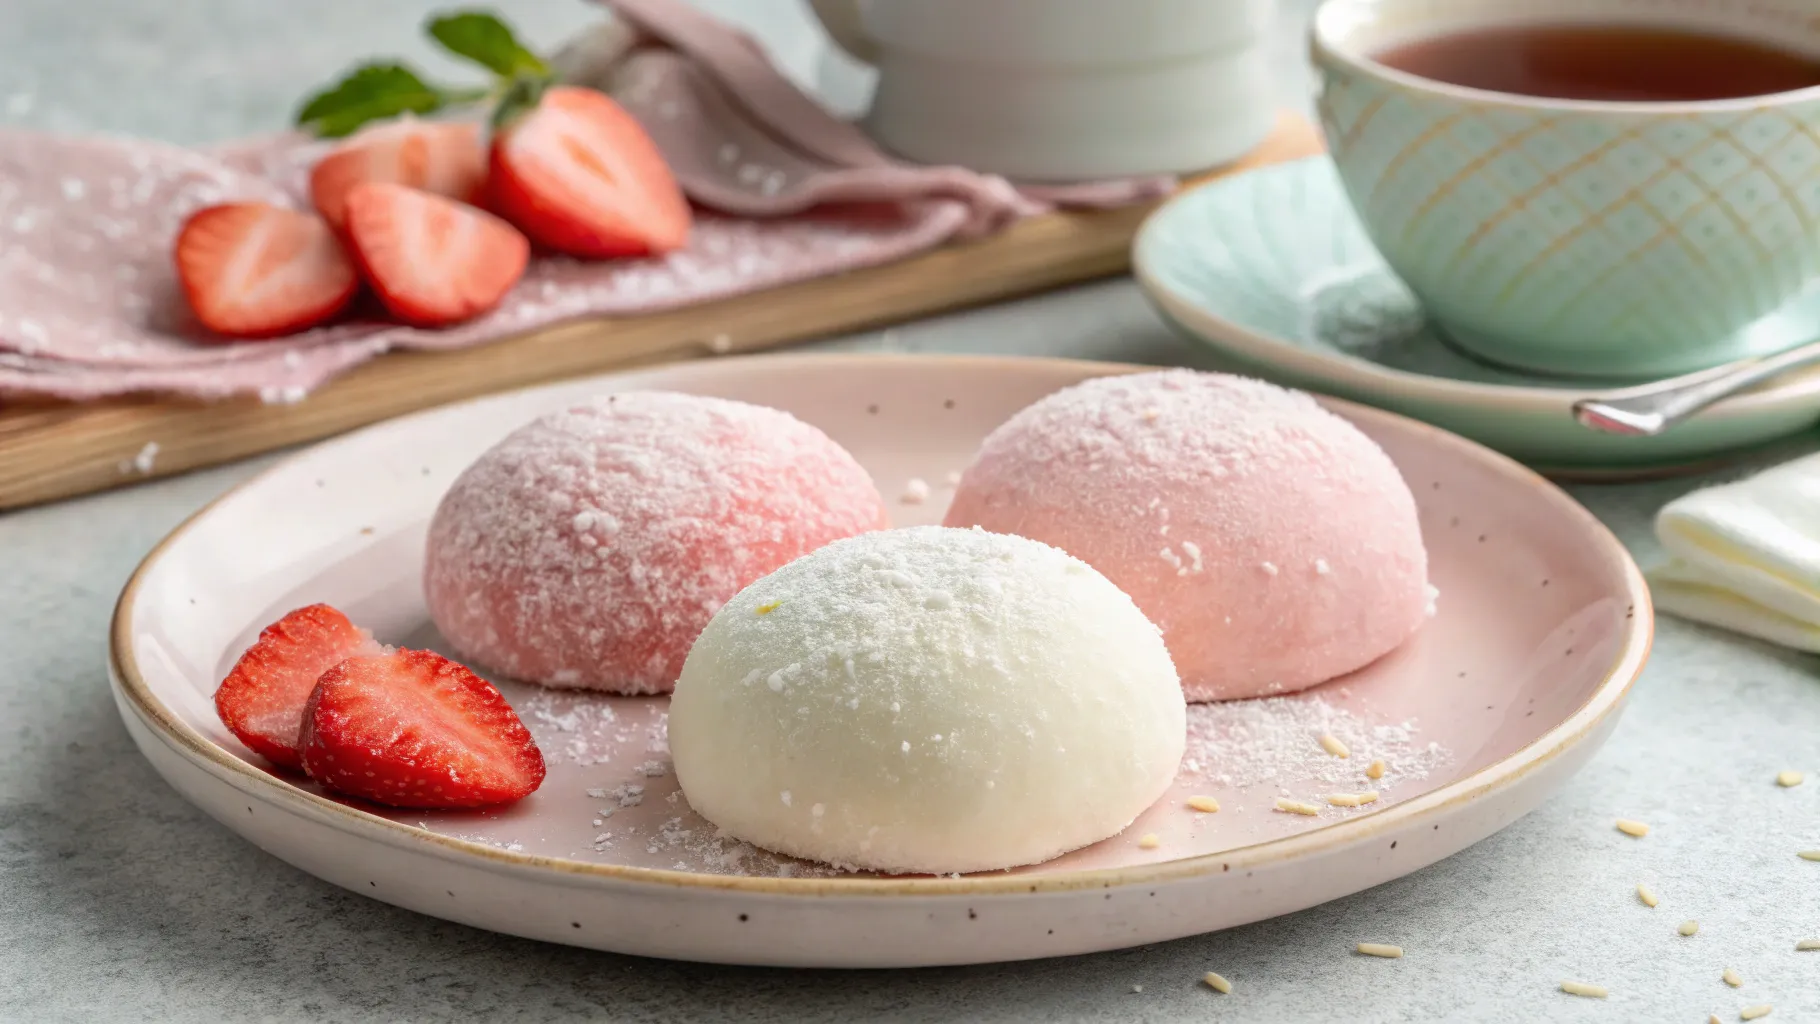
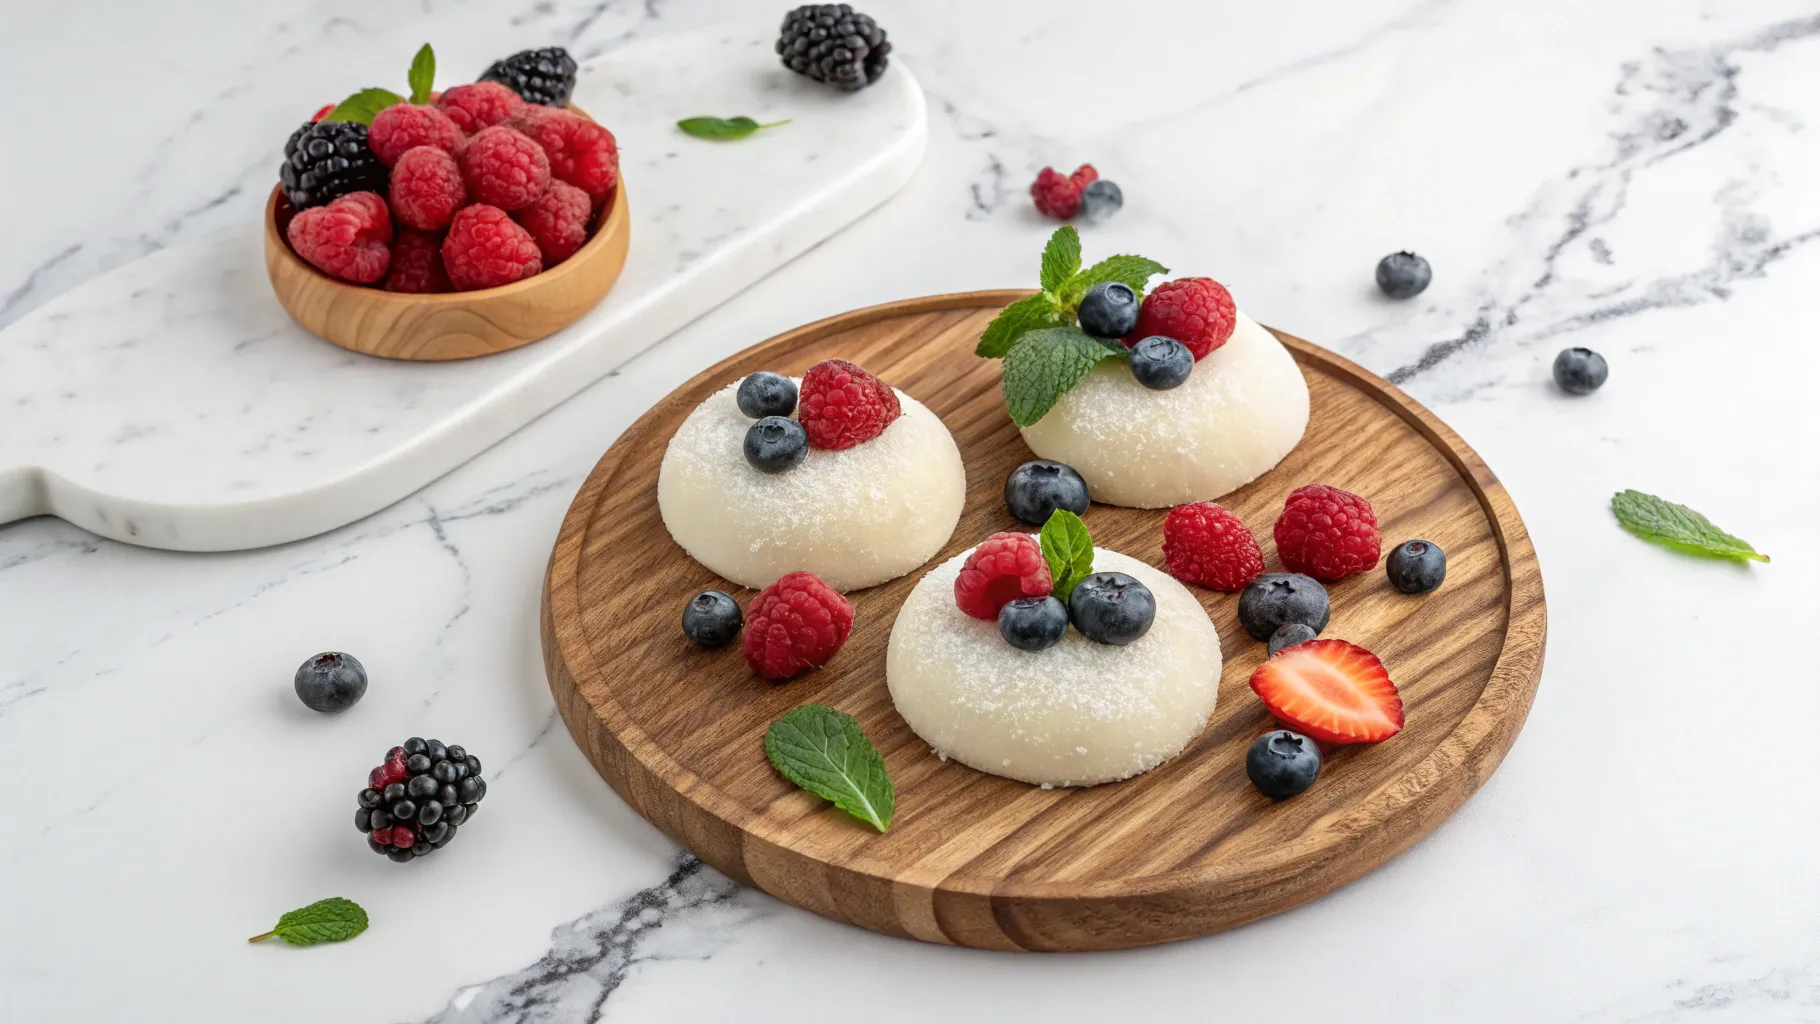
There’s something magical about biting into a soft, chewy mochi and discovering a creamy, fruity surprise inside. Mochi with strawberry cream cheese filling is a delightful twist on a traditional Japanese dessert, one that merges the pillowy charm of glutinous rice with a rich Western-style filling.
While classic daifuku mochi is often filled with red bean or fresh fruit, this variation has captured hearts around the world for its balanced sweetness, vibrant color, and ultra-creamy center. It’s no wonder it’s trending everywhere from Instagram to artisan bakeries.
If you’re already obsessed with soft, chewy textures, you’ll definitely want to explore more delightful desserts like the Strawberry Cheesecake Stuffed Donuts or try your hand at making your own Chocolate Crinkles. These treats, much like Mochi with Strawberry Cream Cheese, a Sweet & Chewy Delight, deliver indulgent flavors and playful textures that are perfect for special occasions or cozy nights in.
Why You’ll Love This Dessert
If you’ve never tried mochi with strawberry cream cheese filling, prepare to fall in love. This dessert has everything: texture, flavor, visual appeal, and it’s surprisingly easy to make at home.
Let’s break down exactly why this treat deserves a permanent spot in your dessert rotation:
1. No-Bake & Freezer-Friendly
No oven? No problem. This recipe is completely no-bake, making it ideal for warmer months or quick prep. Plus, it freezes beautifully, meaning you can make a large batch in advance and pull one out whenever the craving strikes.
2. Tangy, Sweet, & Ultra-Creamy
The contrast between the soft, chewy mochi shell and the rich, tangy cream cheese filling is simply irresistible. The addition of strawberry jam (or puree) brings just the right amount of sweetness, without overwhelming the palate.
📝Note: Each bite delivers the perfect balance of chewy, creamy, and fruity, making it an instant favorite.
3. Great for Meal Prep or Gifting
Because mochi keeps well in both the fridge and freezer, it’s a perfect addition to your make-ahead snack stash. It also holds its shape well, making it an elegant edible gift for birthdays, holidays, or baby showers.
4. Aesthetic, Yet Beginner-Friendly
With their soft pastel hues and rounded form, these mochi balls are almost too pretty to eat. But don’t let their beauty fool you, they’re totally manageable for home cooks, even if you’re new to Japanese sweets.
5. Easily Customizable
Whether you’re avoiding dairy or want to experiment with different fruits, this recipe is super versatile. From vegan versions to tropical flavor swaps, there’s a combo to fit every taste and dietary need.
📝Note: Whether served at a tea party or as a midday treat, these bite-sized desserts offer a refreshing twist on tradition, equal parts charming, comforting, and crave-worthy.

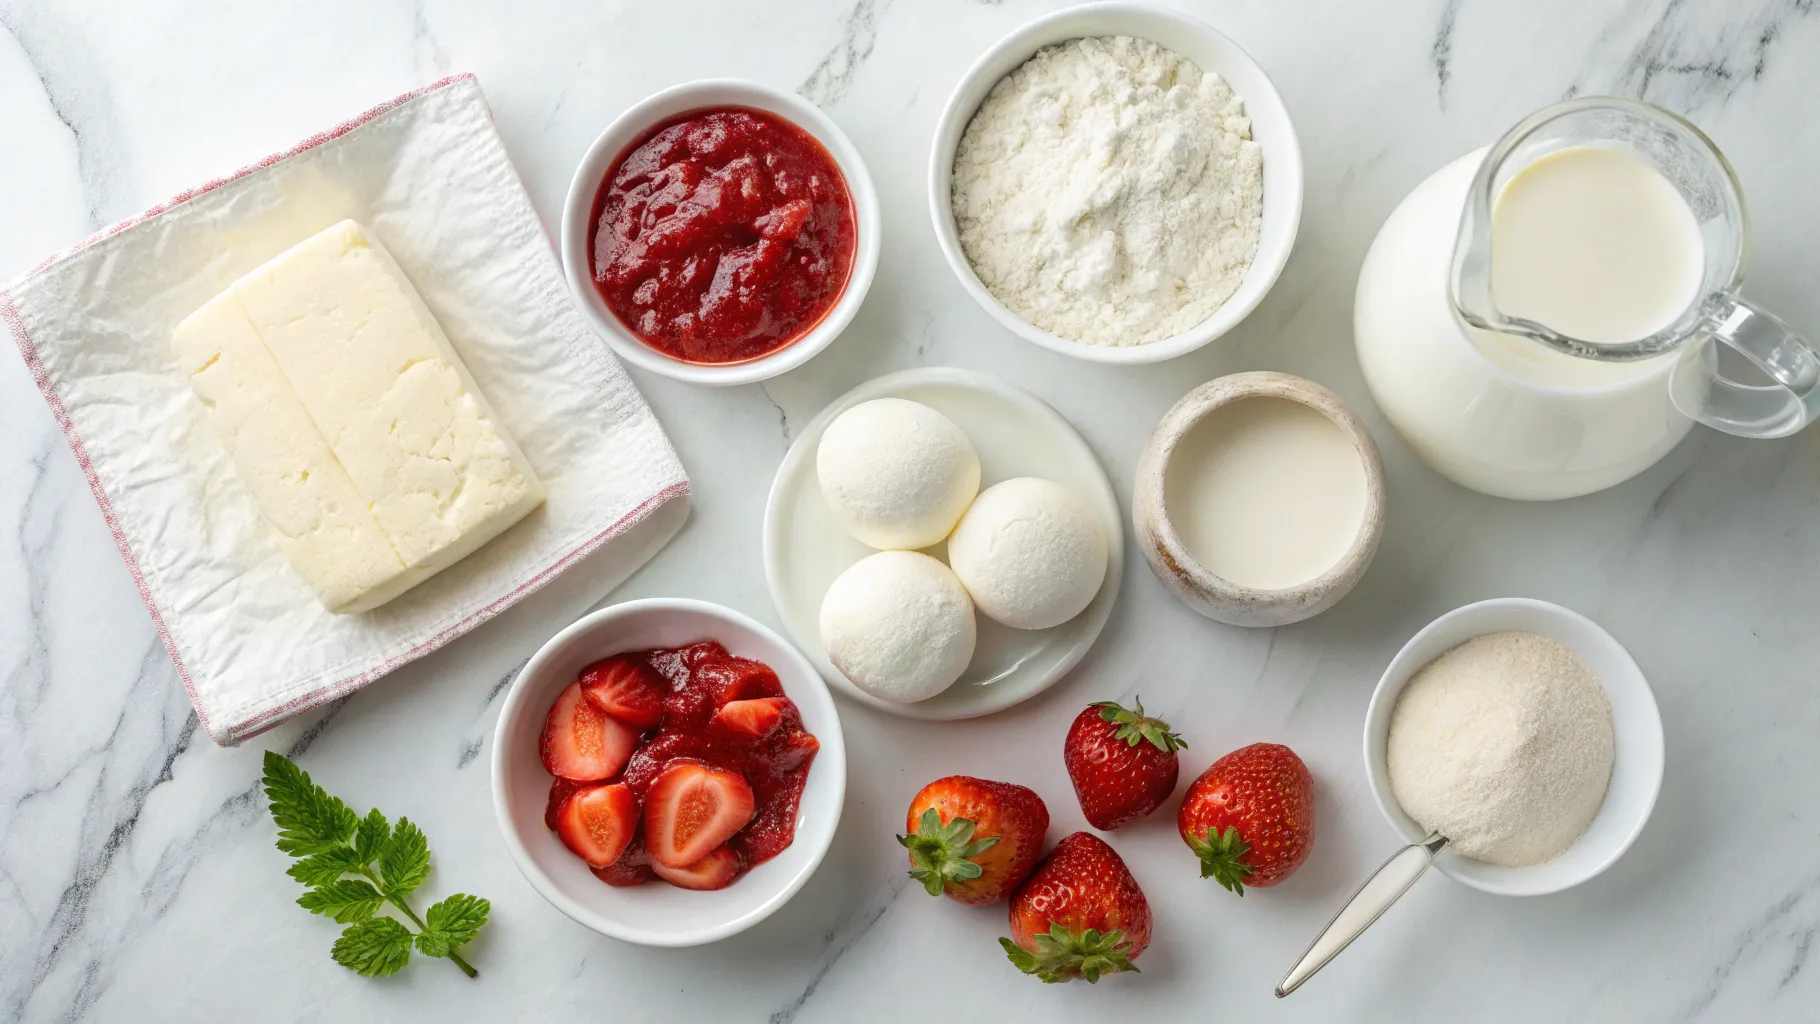
Ingredient Breakdown & Why They Matter
Every element in this recipe plays a role in creating the signature chewiness and flavor layering mochi is known for. Here’s a closer look at what you’ll need:
For the Mochi Dough:
- Glutinous rice flour (mochiko) – The heart of mochi. Creates that stretchy, chewy texture.
- Milk or plant-based milk – Adds smoothness and prevents dryness.
- Sugar – Balances the tartness of the filling.
- Butter (or vegan butter) – Helps soften and smooth the dough after cooking.
- Cornstarch or cooked rice flour – Used for dusting to prevent sticking.
For the Strawberry Cream Cheese Filling:
- Cream cheese – Use full-fat or dairy-free cream cheese for a rich, smooth base.
- Whipping cream – Whipped into the cream cheese for lightness.
- Strawberry jam or puree – Adds fruity sweetness and color.
- Optional: diced fresh strawberries – For texture
- Strawberry powder (or pomegranate powder) – For coating and visual appeal
Tools & Prep Tips Before You Begin
It’s a short list, but being prepared makes a big difference!
- Microwave-safe or heat-proof bowl
- Silicone spatula
- Parchment paper or silicone mat
- Cornstarch or dusting flour
- Plastic wrap or gloves
- Optional: food-safe gloves for mess-free shaping
💡 Pro tip: Chill your filling for at least 1 hour before wrapping to make sealing much easier.
How to Make Mochi with Strawberry Cream Cheese Filling (Step-by-Step)
Making mochi at home might seem intimidating, but once you understand the process, it becomes an incredibly rewarding (and fun!) treat to prepare. This version doesn’t require any special machines, just a little patience, prep time, and love.
Step 1: Make the Filling (Strawberry Cream Cheese)
1. In a mixing bowl, combine:
- 1 cup cream cheese (room temperature)
- ¼ cup strawberry jam or puree
- 2 tablespoons whipping cream
2. Beat until smooth and fluffy.
3. Spoon into 12–14 dollops on parchment paper and freeze for at least 1 hour.
💡 Pro tip: The firmer the filling, the easier it will be to wrap your mochi dough around it.
Step 2: Prepare the Mochi Dough
1. In a microwave-safe bowl, whisk together:
- 1 cup glutinous rice flour
- ¼ cup sugar
- ¾ cup milk (or plant milk)
2. Cover with plastic wrap and microwave in 1-minute intervals, stirring between each.
- Total time: approx. 3 minutes
- The dough should turn slightly translucent and thick.
💡 Pro tip: Alternatively, you can steam this mixture in a heat-proof bowl for 15–20 minutes if avoiding the microwave.
Step 3: Knead & Cool the Dough
- While the dough is still warm, transfer to a non-stick mat or parchment.
- Add 1 tablespoon butter (or vegan alternative) and knead until fully incorporated.
- Dust with cornstarch or cooked glutinous rice flour to keep it from sticking.
- Let cool for 10–15 minutes before handling further.
💡 Pro tip: Use food-safe gloves or wrap your hands in plastic wrap to avoid sticky messes.
Step 4: Divide and Flatten
- Once cooled, cut dough into 12–14 equal pieces.
- Dust each portion lightly and flatten into a disc.
- Work quickly to keep the dough from drying or becoming too soft.
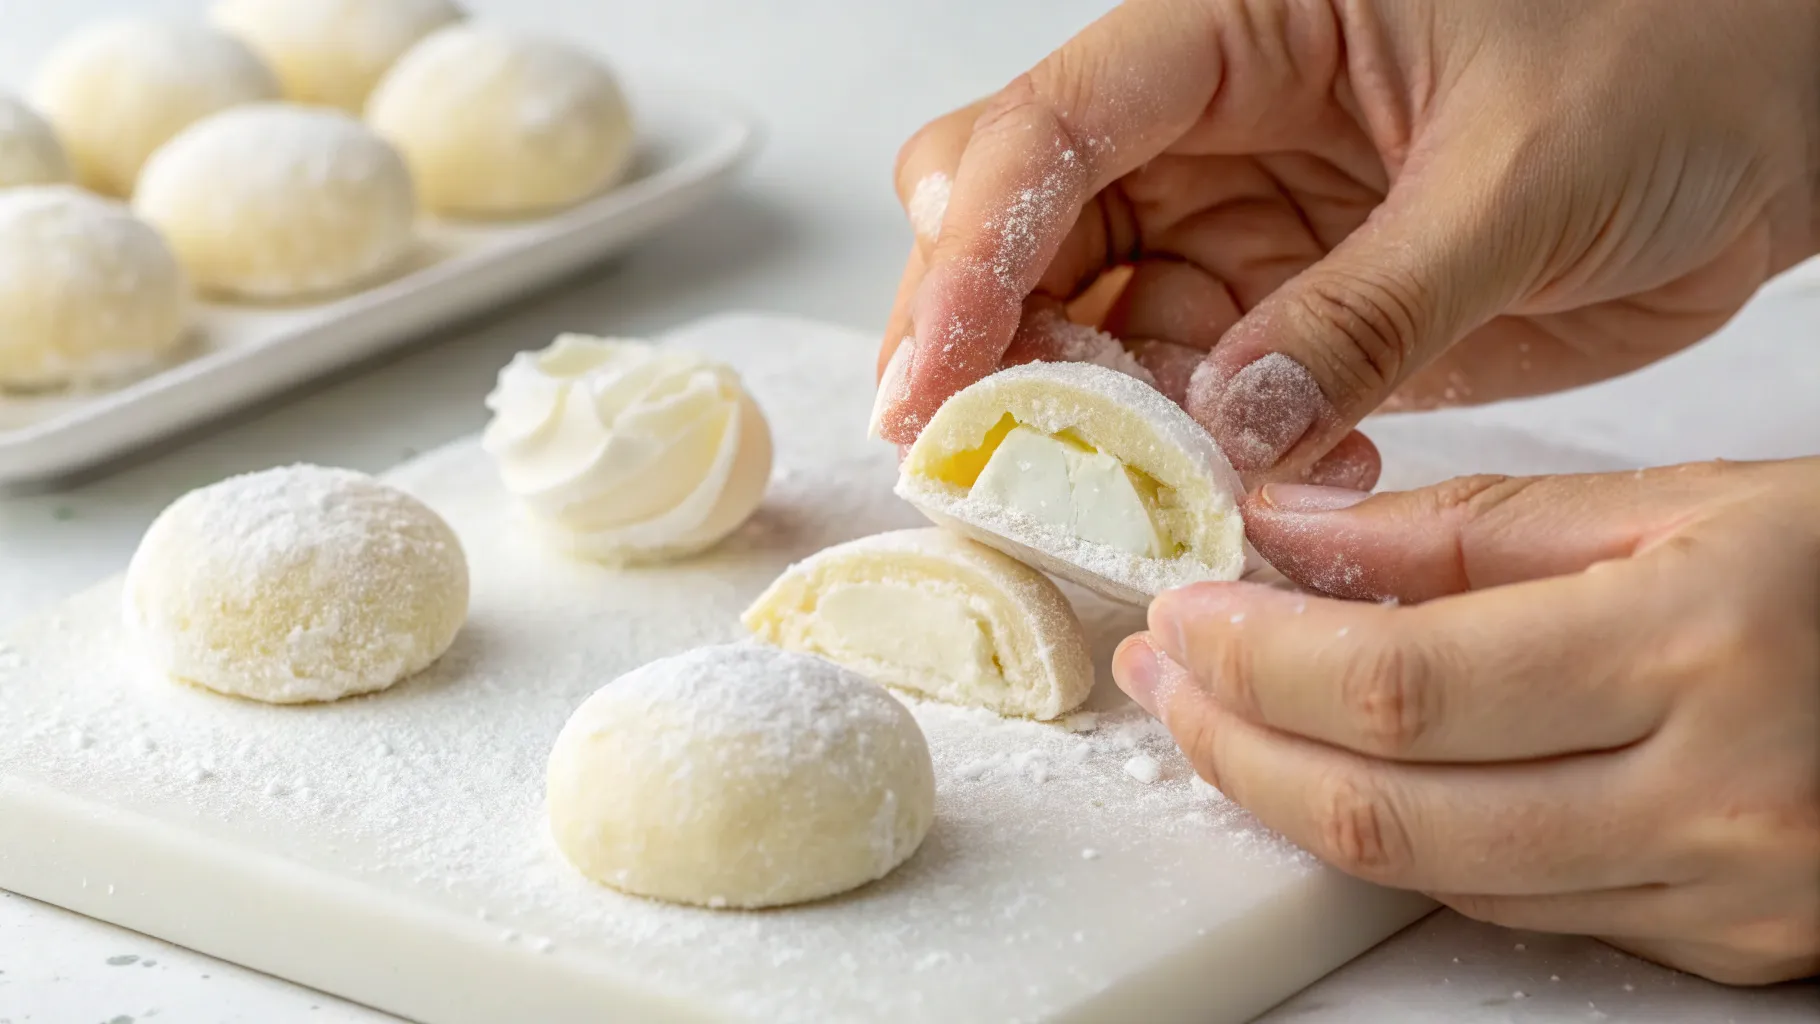
Step 5: Wrap with Filling
- Place a frozen cream cheese filling in the center of each disc.
- Gently pinch and fold the edges up to seal completely.
- Roll into a smooth ball and dust again with strawberry powder or cornstarch.
💡 Pro tip: If you see cracks, dab your fingers with a touch of water and gently smooth them over.
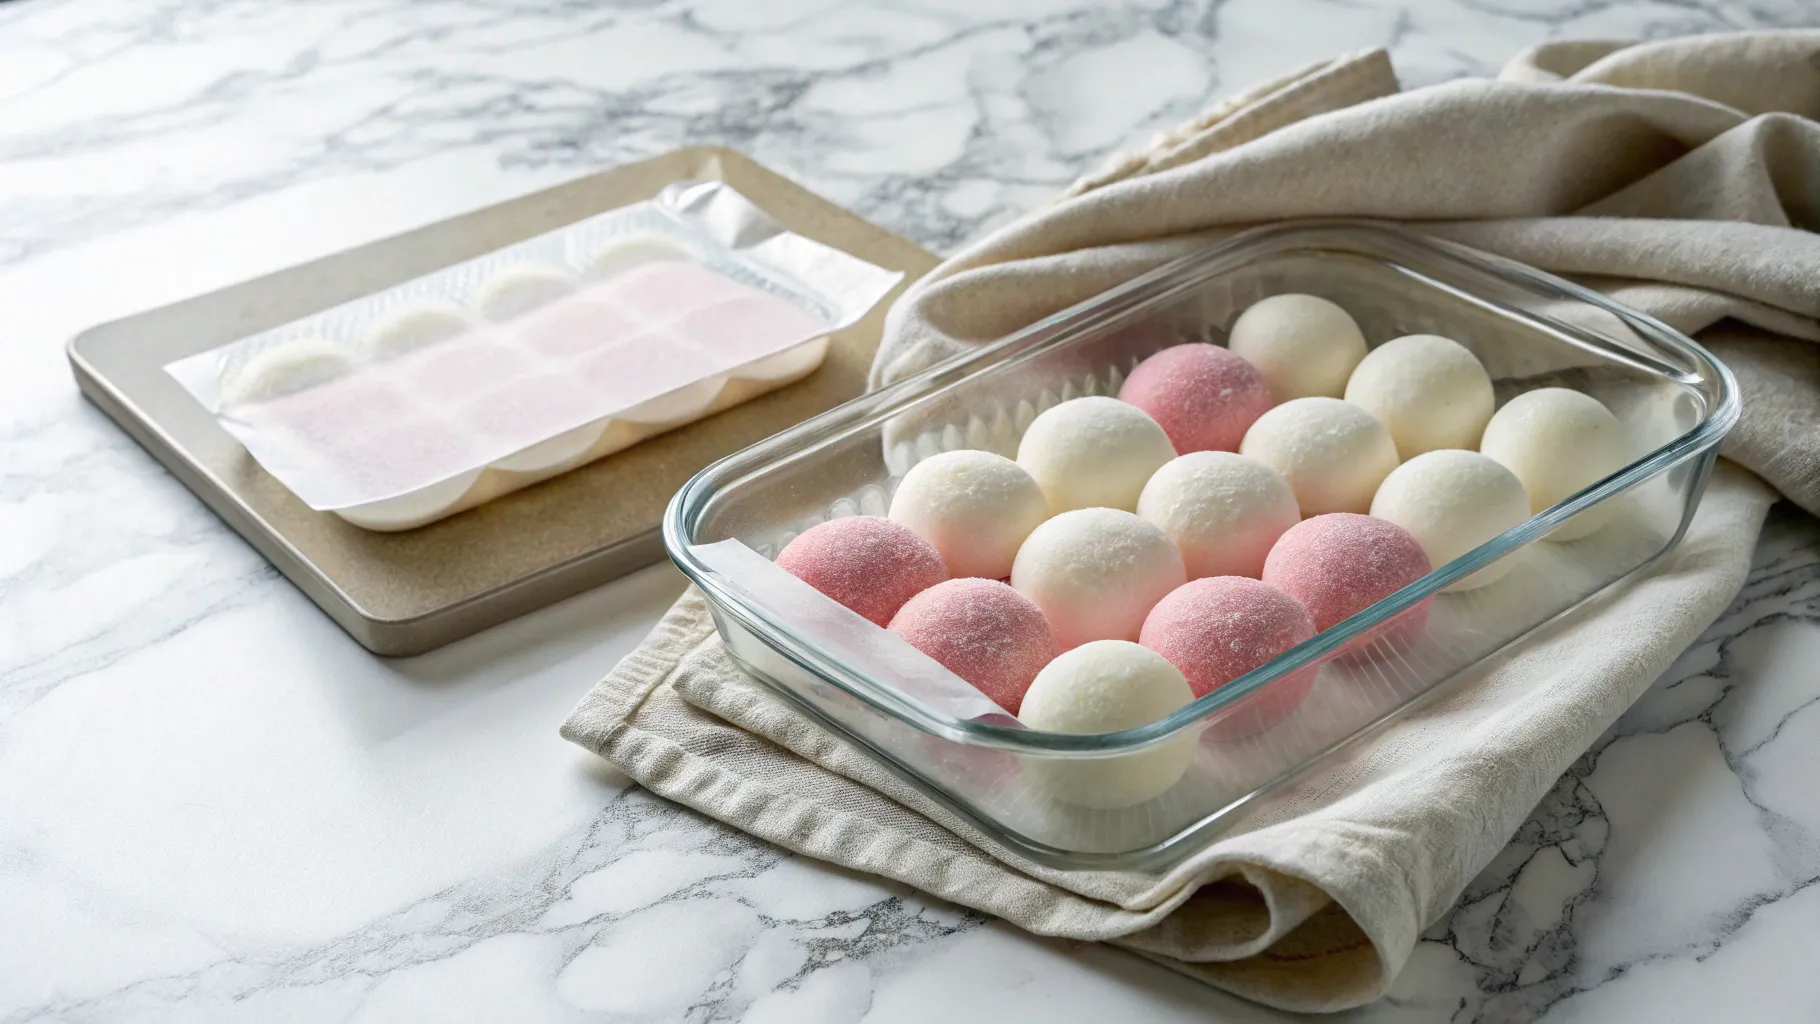
Step 6: Chill and Serve
- Place the completed mochi in a container, seam side down.
- Refrigerate for 30 minutes to set the shape.
- Serve chilled, or slightly room temp for a softer bite.
How to Store & Serve Mochi
Whether you’re making these in advance for a special event or saving a few for later, mochi is surprisingly storage-friendly. Here’s how to keep them soft, safe, and delicious:
1. Fridge Storage
- Place finished mochi in an airtight container
- Use parchment paper to separate layers
- Store in the refrigerator for up to 3 days
- Best texture is within the first 48 hours
2. Freezer Storage
- Freeze individually on a tray until firm
- Transfer to freezer-safe bags
- Thaw at room temp for 10–15 minutes before serving
- Keeps well for up to 1 month
💡 Pro tip: Avoid storing at room temperature for long periods, mochi dough dries out quickly.
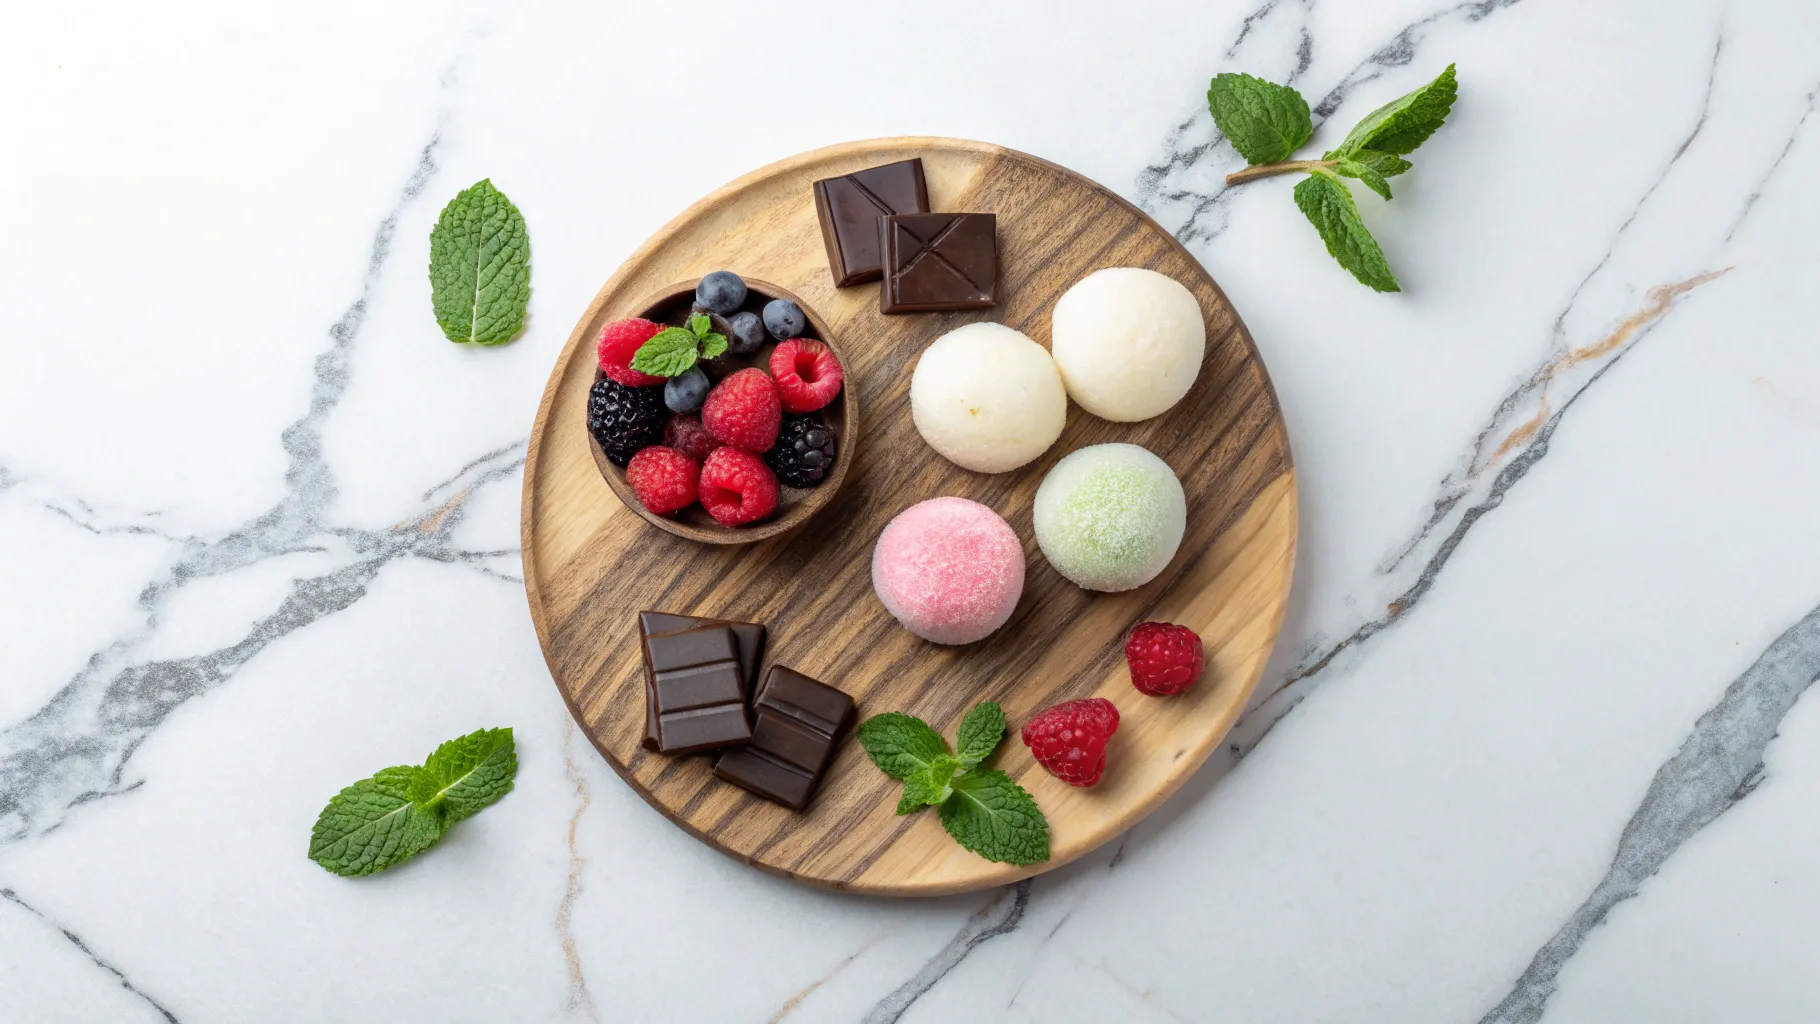
Variations to Try
Once you’ve mastered the technique, the flavor combinations are endless! Here are some fun and functional swaps:
- Matcha & Red Bean: Add 1 tsp matcha to the dough and fill with sweet red bean paste
- Chocolate Cream Cheese: Swap jam for melted dark chocolate in the filling
- Mango or Yuzu: Use mango purée or citrus curd for a tropical twist
- Vegan Version: Use dairy-free cream cheese, coconut cream, and plant milk for a fully vegan treat
- Festive Touch: Roll finished mochi in strawberry powder, crushed freeze-dried fruit, or shredded coconut
💡 Pro tip: Want mochi in different colors? Tint the dough with natural fruit or veggie powders like beetroot or matcha.
What to Serve with Mochi with Strawberry Cream Cheese Filling
While mochi with strawberry cream cheese filling is a showstopper all on its own, the right pairing can turn it into a full-on dessert experience. Thanks to its creamy, chewy texture and fruity center, it shines when served alongside light, palate-cleansing sips and bites.
Whether you’re setting up a dessert table for guests or indulging in a personal treat, here are a few complementary options to make your mochi moment even more special:
1. Matcha Green Tea or Jasmine Tea
Mochi’s creamy center pairs perfectly with earthy teas that cut through its richness.
- Matcha offers a bold, slightly bitter contrast that balances sweetness beautifully.
- Jasmine tea, with its delicate floral notes, refreshes the palate after each bite.
📝Note: Hot tea also enhances the chewiness of mochi, especially when served slightly chilled.
2. Fresh Berries or Fruit Slices
Add visual color and a juicy, tart contrast by pairing your mochi with:
- Strawberries, raspberries, blueberries, or kiwi
- Citrus slices like mandarin, grapefruit, or blood orange
These fruits lighten the plate and create a vibrant, textural balance.
3. Sparkling Yuzu or Citrus Water
Skip the sugary sodas, mochi pairs better with crisp, sparkling drinks that cleanse the palate and highlight the strawberry tang.
Try:
- Sparkling yuzu water
- Lemon-lime infused seltzer
- Light mint-cucumber spritz
📝Note: These drinks offer a cooling contrast without overpowering the mochi’s flavor.
4. Build a Mini Dessert Board
For parties or elevated hosting, mochi is a standout when featured on a small dessert board with:
- Dark chocolate squares
- Roasted almonds or cashews
- Fresh fruit clusters
- Edible flowers or pink rose petals for a whimsical touch
📝Note: The mix of creamy, chewy, crunchy, and juicy elements creates a sensory dessert spread your guests won’t forget.
FAQs About Mochi with Strawberry Cream Cheese Filling
Q1: What’s the difference between mochi and daifuku?
Mochi is the dough, while daifuku refers to mochi stuffed with filling, like cream cheese or red bean.
Q2: Can I make this without a microwave?
Yes! Steam the mochi dough mixture in a heat-proof bowl for 15–20 minutes instead.
Q3: How do I keep mochi from sticking?
Use plenty of cooked glutinous rice flour or cornstarch when handling and wrapping.
Q4: Can I use fresh strawberries in the filling?
Absolutely! Just dice and fold them into the cream cheese. Freeze as directed before wrapping.
Q5: Can I make it dairy-free?
Yes. Use vegan cream cheese, coconut milk, and plant-based butter for a fully dairy-free version.
Final Thoughts
Mochi with strawberry cream cheese filling is one of those desserts that feels like a special treat, yet it’s easy enough to make at home. From its soft chew to the cold, creamy center, each bite offers something comforting, unexpected, and delightfully unique.
Whether you’re celebrating something sweet or just want a new freezer-friendly dessert, this recipe is a keeper. It’s customizable, beautiful to serve, and satisfying to make from scratch.
💡 Enjoyed this recipe?
Follow us for daily kitchen tips and tasty inspiration!
📌 Pinterest | 📘 Facebook | 📸 Instagram

Mochi with Strawberry Cream Cheese – A Sweet & Chewy Delight
This no-bake Japanese-inspired dessert features soft, chewy mochi wrapped around a creamy, tangy strawberry cream cheese filling. Easy to customize, freezer-friendly, and perfect for parties or a sweet personal treat.
- Total Time: 1 hour (including chill time)
- Yield: 12–14 mochi balls 1x
Ingredients
For the Filling:
- 1 cup cream cheese (softened)
- ¼ cup strawberry jam or puree
- 2 tbsp whipping cream
- (Optional) diced fresh strawberries
For the Mochi Dough:
- 1 cup glutinous rice flour (mochiko)
- ¼ cup sugar
- ¾ cup milk (or plant-based milk)
- 1 tbsp butter or vegan butter
- Cornstarch or cooked rice flour (for dusting)
Optional Toppings:
- Strawberry or pomegranate powder
- Shredded coconut
- Freeze-dried strawberry crumbs
Instructions
- Make the filling: Beat cream cheese, jam, and cream until smooth. Spoon into small dollops and freeze for 1 hour.
- Cook mochi dough: Mix glutinous rice flour, sugar, and milk. Microwave in 1-minute intervals (total ~3 mins), or steam 15–20 mins.
- Knead & cool: While warm, knead in butter. Dust with starch and let cool.
- Divide & flatten: Cut into 12–14 portions, flatten into discs.
- Wrap: Place frozen filling in center of each, pinch to seal, and roll into balls.
- Chill & serve: Refrigerate 30 minutes before serving.
- Prep Time: 20 minutes
- Cook Time: 10 minutes
- Category: Dessert, No-Bake, Japanese-Inspired
- Method: Microwave or Steam
- Cuisine: Japanese Fusion, Asian-Inspired